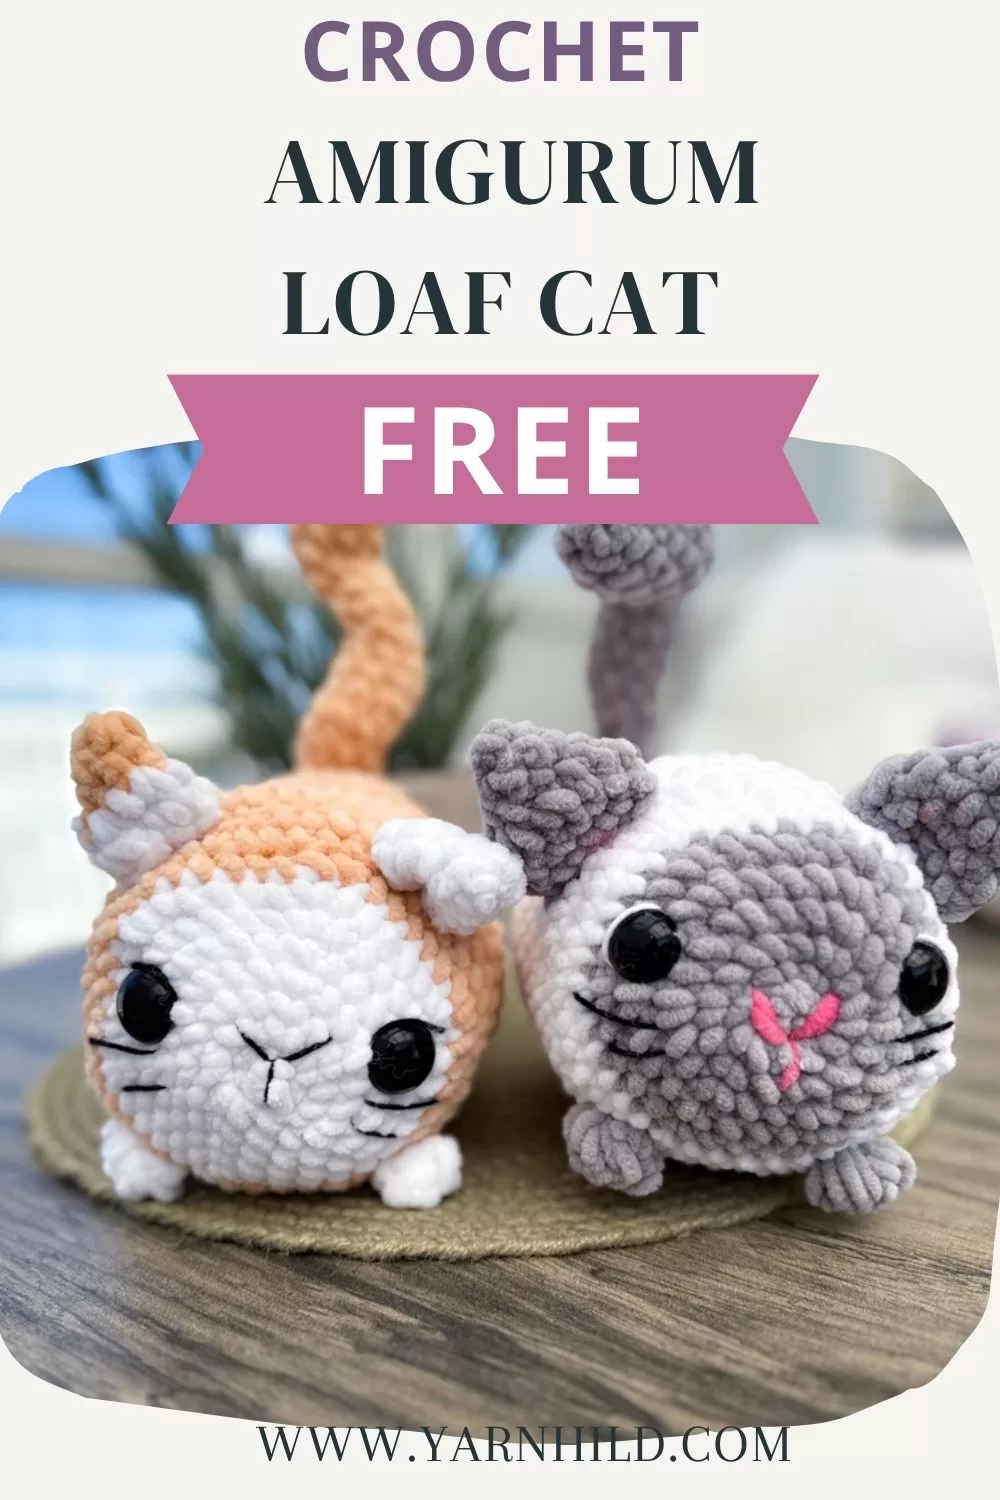
Loaf Cat Crochet Pattern – Cute, Quick, and Cuddly (Free!)
I had so much fun designing this crochet loaf cat amigurumi! It’s inspired by the classic “cat loaf” pose—paws tucked in, tail wrapped around, looking way too cozy. This pattern is simple, works up quickly, and is a great project if you want something soft, cute, and beginner-friendly.
Scroll down for the free pattern or get the ad-free version here (German and Englisch)

Disclosure: This post contains affiliate links. If you click and purchase, I may receive a small commission at no extra cost. Thank you for supporting Yarnhild and helping me share more free patterns!
In this post, you’ll find the full pattern, a simple step-by-step tutorial, and a video to follow along. You can easily change the colors or add your details to make your loaf cat unique!

Inspiration behind the design.
This crochet loaf cat amigurumi was inspired by my cat, Linus. He’s big and fluffy and loves stretching out on the windowsill. When he tucks in his legs and curls up just right, he turns into a perfect loaf. Honestly, he is the loaf cat.
I’ve seen cats do that cozy, compact pose before, but Linus does it so often and so perfectly that I just had to turn it into yarn. That soft, round shape was begging to become an amigurumi — and now it has!

But I also wanted to add something that made this crochet loaf cat a little more fun, giving it personality and movement. That’s where the tail comes in. I designed a big, curved tail that can stand up independently! It’s made with a pipe cleaner inside, so it holds its shape and can be posed however you like. I

You can also customize your loaf cat amigurumi easily — change the colors, add stripes, facial details, or even make a whole row of loaf cats in different poses. It’s a quick project with lots of room for creativity, and I can’t wait to see how you make it your own.

Materials for Your Crochet Loaf Cat Amigurumi
- Yarn: Chenille yarn in two colors
(I used grey for the face and paws, and white for the body, the other cat is made in orange) - Hook: 4.5 mm crochet hook
- Stuffing: Polyester fiberfill
- Safety eyes: I used 25 mm
- Yarn needle (for sewing and embroidery)
- Scissors
- Pipe cleaner or floral wire (for shaping the tail)
- Optional: Stitch marker to keep track of rounds
Looking for More Free Crochet Patterns?
If you enjoy this crochet loaf cat amigurumi and want more free patterns, tutorials, and behind-the-scenes updates, subscribe to my newsletter. You’ll get new patterns straight to your inbox, plus tips, seasonal projects, and Yarnhild news.
Looking for more free patterns using chenille yarn?
Check out these:
©2025 Yarnhild. All rights reserved.
This pattern is intended for personal use only and may not be used for commercial purposes. It may not be reproduced, distributed, or transmitted in any form or by any means, including photocopying, recording, or other electronic or mechanical methods, without prior written permission from the copyright holder. For permission requests, please get in touch with Yarnhild at yarnhild@outlook.com.Unauthorized use and/or reproduction of this pattern or any part of it is strictly prohibited and may result in legal action. Thank you for respecting the hard work and creativity behind Yarnhild patterns.
YouTube Video (English version)
YouTube Video (German version)

Crochet Loaf Cat
Materials
- ch – chain
- rnd – round
- st – stitch
- sc – single crochet
- sc inc – increase (2 sc in the same stitch)
- sc2tog – single crochet two stitches together (decrease)
- sl st – slip stitch
- MR – magic ring
- BO – bobble stitch (see instructions below)
Tools
- This pattern uses chenille yarn from Hobbii (Baby Snuggle), but you can also use cotton, acrylic, or any other yarn you like, depending on the look and texture you want.
- Color A white): approx. 40 g
- Color B (orange): approx. 50 g
- Crochet hook: 4.5 mm
- Safety eyes: 25 mm (you can also use larger or smaller eyes, depending on the expression you want)
- Fiberfill stuffing
- Scissors
- Tapestry needle
- Embroidery yarn in black, white, and pink for face details.
Instructions
Body
The body and all the other parts are then crocheted in continuous spiral rounds. Use a stitch marker and move it up as you go.
Color A (White or the color of choice)
Rnd 1: 6 sc in a MR = 6 sc
Rnd 2: sc inc x 6 = 12 sc
Rnd 3: (1 sc, sc inc) x 6 = 18 sc
Rnd 4: (2 sc, sc inc) x 6 = 24 sc
Rnd 5: (3 sc, sc inc) x 6 = 30 sc
Rnd 6: (4 sc, sc inc) x 6 = 36 sc
Switch to color B (orange)
Pull through with white yarn to create a smooth color transition on the final stitch of the last round in orange.
Rnd 7: (5 sc, sc inc) x 6 = 42 sc
Rnd 8: (6 sc, sc inc) x 6 = 48 sc
Insert safety eyes between rounds 4 and 5, leaving about 6–7 stitches between them.
Rnd 9–24: 1 sc in each st = 48 sc (15 rounds).
You can insert a color patch to mimic natural spots. This is optional, and placement is flexible, but the example below will position it nicely on the back.
Example Placement:
Rnd 16: 21 sc in orange, 2 sc in white, 25 sc in orange
Rnd 17: 21 sc in orange, 3 sc in white, 24 sc in orange
Rnd 18: 21 sc in orange, 5 sc in white, 22 sc in orange
Rnd 19: 21 sc in orange, 3 sc in white, 24 sc in orange
Rnd 20: 21 sc in orange, 2 sc in white, 25 sc in orange
Tip: Carry the orange yarn behind your work while crocheting with white. This minimizes loose ends and keeps your patch neat. Check the video tutorial for a visual guide.
After Round 20, continue with the main color (orange) and proceed with the pattern as usual.
Rnd 25: (6 sc, sc2tog) x 6 = 42 sc
Rnd 26: (5 sc, sc2tog) x 6 = 36 sc
Rnd 27: (4 sc, sc2tog) x 6 = 30 sc
Add filling Materials.
Rnd 28: (3 sc, sc2tog) x 6 = 24 sc
Rnd 29: (2 sc, sc2tog) x 6 = 18 sc
Rnd 30: (1 sc, sc2tog) x 6 = 12 sc
Rnd 31: sc2tog x 6 = 6 sc
Finish by making a sl st into the next stitch, fastening off, and closing the opening using a tapestry needle.
Ears (make 2)
Color: Orange and white (optional
Rnd 1: 4 sc in a magic ring = 4 sc
Rnd 2: sc inc, 3 sc = 5 sc
Rnd 3: sc inc, 4 sc = 6 sc
Rnd 4: sc inc in each st = 12 sc
Rnd 5: sc inc, 5 sc, sc inc, 4 sc, sc inc = 15 sc
Sl st into the next stitch. Fasten off and leave a long tail for sewing.
Tip: Vary with the colors on the ears. You can do one ear in each color, or one ear in two colors. For example, start with color A and change to color B after round 4.
Tail
Color: Orange
Rnd 1: 6 sc in a magic ring = 6 sc
Rnd 2: (1 sc, sc inc) x 3 = 9 sc
Rnd 3–6: 1 sc in each st = 9 sc
Rnd 7–10: (3x sc2tog, 3x sc inc) = 9 sc
Insert a pipe cleaner and begin lightly stuffing the tail.
Rnd 11–12: 1 sc in each st = 9 sc
Rnd 13–16: (3x sc inc, 3x sc2tog) = 9 sc
Continue stuffing as you go.
Rnd 17–26: 1 sc in each st = 9 sc
Fasten off and leave a long tail for sewing.
Front Paws (make 2)
The front paws are crocheted directly onto the body using a bobble stitch (BO).
In white.
Insert your hook into the body around the color change round (between rounds 8 and 9), about 7 stitches away from the eye — or wherever the paw placement looks right to you.
Pull up a loop and crochet 3 chains outward from the body.
Then insert your hook back into the body, in or near the same area, and crochet 1 bobble stitch (BO) directly into the body.
Finish with a slip stitch into the same stitch to secure the bobble. Weave in the end.
Crochet 2 back paws to the bottom of the body on rounds 20 and 21, directly in line with the front paws.
How to crochet the bobble stitch
Yarn over, insert the hook in the next stitch, and pull up a loop. Yarn over and pull through 2 loops, repeat for a total of 4 times until you have pulled up 5 loops on the hook. Yarn over and pull through all loops, slipstitch into the same stitch.
Assembly
Tip: Position the parts using pins before sewing. This helps you find the perfect placement for the ears and tail.
Sew the ears between rounds 9 and 10, with about 5 stitches of space between them. Attach the tail at the back, at round 30.
You can secure it again a few rounds higher up along the body to help it stand upright and maintain its curled shape.
Eye Highlights
Use white yarn or fine embroidery thread to give your Loaf Cat a lively expression. Insert the needle right next to the upper edge of the safety eye — very close to the eye itself.
Bring the thread diagonally downward and insert it again near the eye's lower edge and close to the edge. This creates a subtle diagonal light reflection that adds depth and personality to the face
.
Whiskers
Use black, fine yarn (like cotton or embroidery thread).
Embroider two whiskers on each side of the face. Start near the side of the snout and angle the thread outward in a gentle diagonal line. Try to keep both sides balanced — but don’t worry if they’re not perfectly symmetrical. A little irregularity adds charm and character.
Nose
Use pink or black yarn to embroider a small nose. Stitch a tiny “V” shape centered on the face below the eyes. Then, add a short vertical line going downward from the point of the V to complete the nose and mouth details.