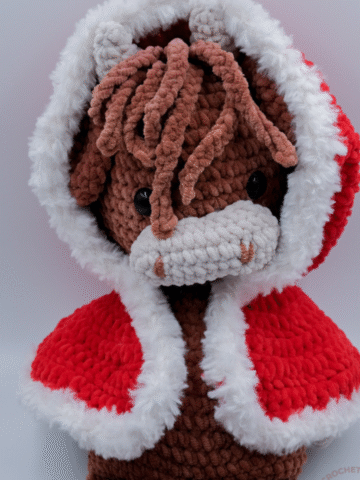
Fergus the Crochet Highland Cow
Crochet Highland Cow – A Cute and Cozy Farmyard Friend!
Today, I’m excited to share a fun and adorable crochet project – the Crochet Highland Cow! With its fluffy coat, charming little horns, and endearing face, this crochet plushie makes the perfect gift or decorative piece for any animal lover. Whether you’re a beginner or an experienced crocheter, this project is a must-try!
Scroll down for the free version, or get the ad-free version on Etsy! Or save it on Ravelry.
German version is here!
Pin this for later on Pinterest!

Scroll down for the free version, or get the ad-free version on Etsy!
New on Yarhhild!
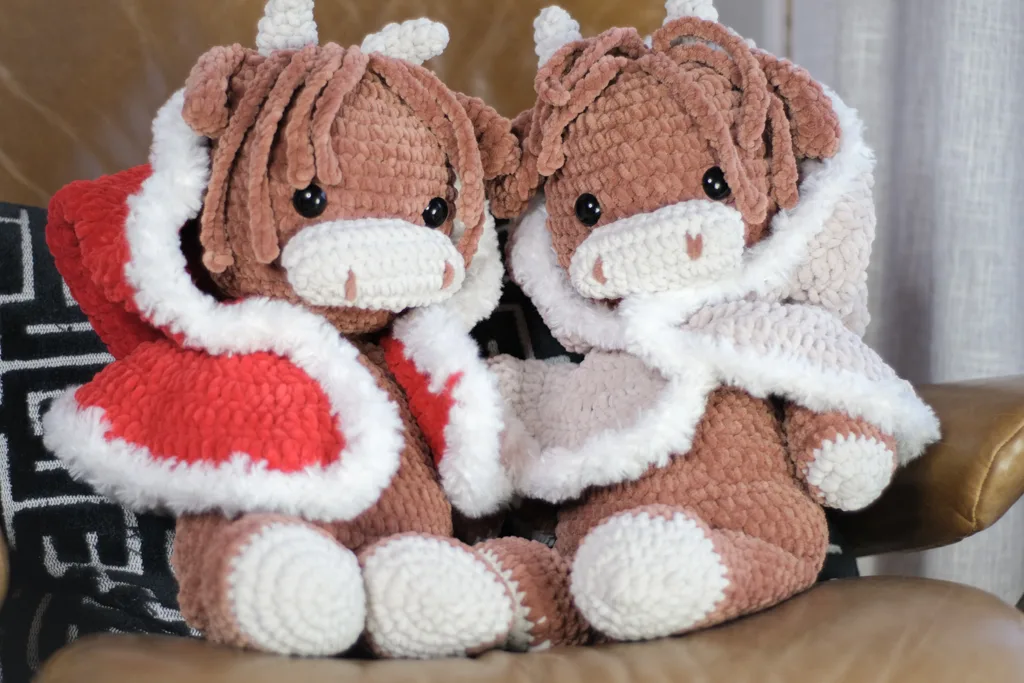
Check out his Winter Cape!
Find the free pattern here:
Why Crochet a Highland Cow?
Highland cows (or "coos" as they’re affectionately called in Scotland) are known for their shaggy fur and gentle personalities. Crocheting one allows you to create a soft, cuddly version of this beloved farm animal. These crochet cows make fantastic gifts for children, home decor pieces, or a fun addition to your market stall!
Looking for more free crochet patterns?
Check out this cute crochet dinosaur!
How to Customize Your Highland Cow
One of the best things about crocheting is that you can personalize your projects to make them truly unique. Here are some ideas to customize your Highland cow:
- Change the Yarn Texture: Use fluffy yarn for a realistic shaggy coat, or opt for smooth yarn for a different look.
- Experiment with Colors: Traditional Highland cows are brown, ginger, or cream, but why not try grey, black, or pastel shades?
- Add Accessories: A cute little flower crown, a bandana, or even a tiny bell around its neck can give your cow extra personality.
- Adjust the Size: Use different yarn weights and hook sizes to make your Highland cow bigger or smaller.
Supplies Needed
If you're excited to get started, here are the basic materials you'll need:
- Yarn: Choose a plush or textured yarn for the signature shaggy look.
- Crochet Hook: Match your hook size to your yarn choice. I used a 4,5 mm in this pattern.
- Stuffing: To give your cow a soft, huggable shape.
- Safety Eyes or Embroidery Thread: For expressive eyes.
- Stitch Marker: Helps keep track of your rounds.
- Tapestry Needle: This is used to sew the parts together.
Tips for Crocheting Your Highland Cow
- Work in Continuous Rounds: Many amigurumi projects, including this one, require working in a spiral rather than joining rounds.
- Use a Stitch Marker: This helps keep track of your stitches and ensures an even shape.
- Stuff Firmly but Evenly: Add enough stuffing to keep your cow plump without overstuffing and distorting its shape.
- Take Your Time on the Details: The little features like the horns, nose, and eyes make a big difference in bringing your Highland cow to life.

Share Your Work!
If you make a Crochet Highland Cow, I’d love to see it! Share your finished projects on Instagram using #CrochetHighlandCow, and tag me to admire your adorable creations.
Looking for more crochet inspiration? Check out other free patterns on my blog, and don’t forget to subscribe for updates!
Happy Crocheting! 🐮💛
©2025 Yarnhild. All rights reserved. This pattern is for personal use only and may not be used for commercial purposes. This pattern may not be reproduced, distributed, or transmitted in any form or by any means, including photocopying, recording, or other electronic or mechanical methods, without the prior written permission of the copyright holder. For permission requests, please contact Yarnhild at yarnhild@outllook.com. Unauthorized use and/or duplication of this pattern or any portion thereof is strictly prohibited and may result in legal action. Thank you for respecting the hard work and creativity of Yarnhild.

Crochet Highland Cow Pattern
Materials
- About the pattern
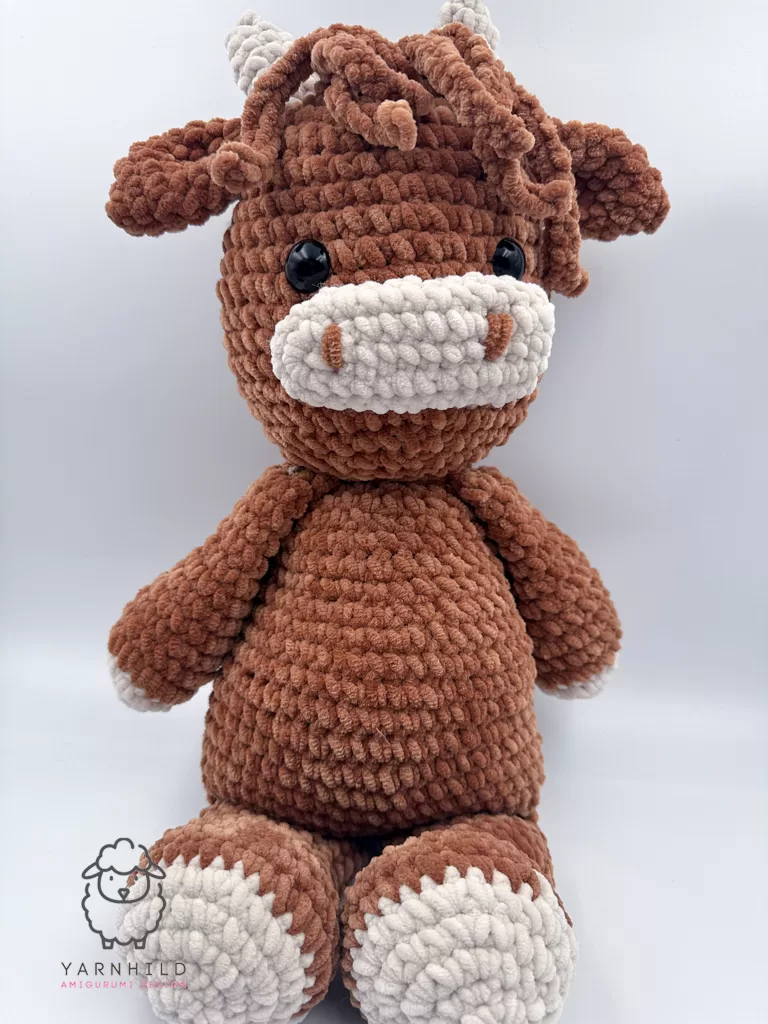
- Make a cute crochet Highland Cow with me! The parts for the feet and body are crocheted together, and the other parts are made separately and sewn together. All parts are made in continuous rounds.
- Finished size: About 52 cm/ 20,4 inches.
Tools
- This pattern uses Panduro Yarn Velvet, but other yarns, such as cotton and acrylic, can be used. Just use a hook that fits your yarn.
- You`ll need 2 colors of yarn, the featured example uses:
- (A) Primary color, brown: About 200g
- (B) Foot pads and nose, beige: About 50 g
- 4,5 mm crochet hook
- Filling materials
- Scissors
- Safety eyes 20 mm
- Knitting needles for support for attaching the body parts.
- Empty toilet roll or simular for support of the head.
Instructions
Abbreviations
ch-chain
rnd–round
St(s)–stitches
Inc–increase
dec - decrease
sc - single crochet
dc-double crochet
mr–magic ring
sl st- slip stitch
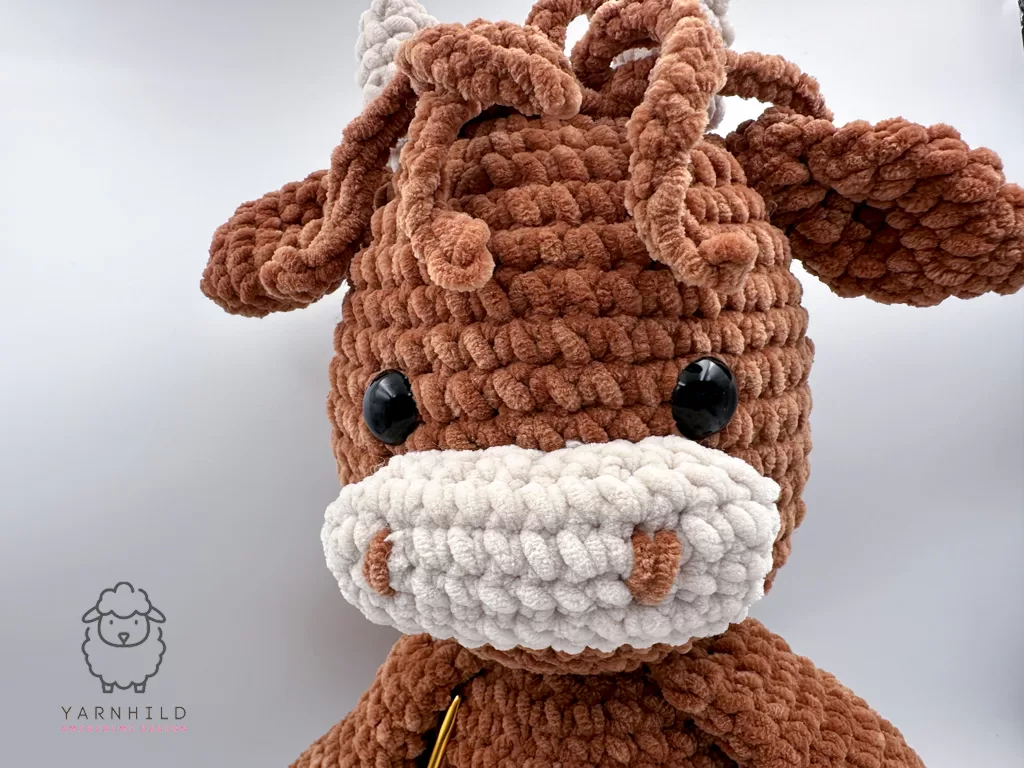
Head
Color A
Rnd 1: 12 sc into a mr (12 sc)
Rnd 2: 2 sc in each st around (24 sc)
Rnd 3: (3 sc, sc inc) x 6 (30 sc)
Rnd 4: (4 sc, sc inc) x 6 (36 sc)
Rnd 5: (5 sc, sc inc) x 6 (42 sc)
Rnd 6-16: 1 sc in each st for 10 rounds.
Rnd 17: (5 sc, sc dec) x 6 (36 sc)
Place the safety eyes between rounds 10 and 11, 6 sc stitches apart.
Rnd 18: (4 sc, sc dec) x 6 (30 sc)
Rnd 19: (3 sc, sc dec) x 6 (24 sc)
Add stuffing.
Rnd 20: (2 sc, sc dec) x 6 = (18 sc)
Sl st into the first stitch and fasten off. Leave a long tail for sewing.
Horn
Make 2
In color B
Rnd 1: 4 sc in a mr (4 sc)
Rnd 2: 4 sc
Rnd 3: sc inc, 3 sc (5 sc)
Rnd 4: sc inc, 4 sc (6 sc)
Rnd 5: sc inc, 5 sc (7 sc)
Rnd 6: sc inc, 6 sc (8 sc)
Rnd 7: sc inc, 7 sc (9 sc)
Sl st into the first sc and fasten off. Leave a tail for sewing.
Feet and body
Made in continuous rounds. Use a stitch marker and move it up as you go.
The feet and body are made in one piece. First, we start with the feet. The feet will later be joined and the body will be crocheted on top of the feet
Feet
Color A and B
Start with color B
Rnd 1: 6 sc into a mr (6 sc)
Rnd 2: 2 sc in each st around (12 sc)
Rnd 3: (1 sc, sc inc) x 6 (18 sc)
Rnd 4: (2 sc, sc inc) x 6 (24 sc)
Rnd 5: (3 sc, sc inc) x 6 (30 sc)
Change to color A on the last pull-trough of the last sc of round 5.
Rnd 6-8: 1 sc in each st for 3 rounds.
Rnd 9: 3 sc, (sc dec, 1 sc) x 6, 9 sc (24 sc)
Rnd 10. sc dec x 6, (1 sc, sc inc) x 6 (24 sc)
Rnd 11: 1 sc in each st.
Rnd 12: sc dec x 4, 16 sc (20 sc)
Rnd 13-17 1 sc in each st for 5 rounds.
Sl st into the first sc and fasten off.
Do not cut the yarn on the second foot. Place the feet next to each other and join them as follows: Place the feet next to each other. Make sure that the feet are facing outwards. Join the feet with a sl st. See pictures on the next page.
Continue with the body in color A.
Joining the Feet and Continuing with the Body
- Position the feet so they are aligned correctly for joining.
- Join the feet together with a slip stitch at the inner sides. This will connect them into a single piece.
- Place a stitch marker at the slip stitch to mark the beginning of the round.
- Continue crocheting around both feet, working 1 single crochet (sc) in each stitch around. Be sure to work across both feet, including the stitches from the joining slip stitch if necessary.
- You should have a total of 40 single crochet (sc) stitches at the end of the round.
- From here, follow the pattern as instructed to continue crocheting the feet and body as one piece.
Body:
Continuing from the feet.
Rnd 1: 1 sc in each stitch (40 sc)
Rnd 2: (3 sc, sc inc) x 10 (50 sc)
Stuff the feet. Only stuff ⅔
of the feet so the cow can sit.
Rnd 3- 11: 1 sc in each stitch for 9 rounds.
Rnd 12: (3 sc, sc dec) x 10 (40 sc)
Rnd 13: 1 sc in each st (40 sc)
Rnd 14: (2 sc sc dec) x 10 (30 sc)
Rnd 15-16: 1 sc in each st for 2 rounds (30 sc)
Start stuffing and from this point
and stuff as you go.
Rnd 17: (3 sc, sc dec) x 6 (24 sc)
Rnd 18: : 1 sc in each st (24 sc)
Rnd 19: (2 sc, sc dec) x 6 (18 sc)
Sl st into the first st and fasten off.
Nose
In color B.
Rnd 1: Ch 13, 1 sc in each st. Work on the opposite side. (12 sc)
Place a stitch marker before round 2.
Rnd 2: Sc inc, 11 sc, (sc inc) x2, 10 sc, sc inc. (29 sc)
Rnd 3: 1 sc, sc inc, 12 sc, sc inc, 13 sc. sc inc (32 sc)
Rnd 4: 1 sc in each st (32 sc)
Sl st into the first st and fasten off. Leave a long tail for sewing.
Ears
In color A.
Rnd 1: 4 sc in a mr
Rnd 2: sc inc x 4 (8 sc)
Rnd 3: ( 1 sc, sc inc) x 4 (12 sc)
Rnd 3-6. 1 sc in each st for 3 rounds.
Rnd 7: ( 1 sc, sc dec) x 4 (8 sc)
Rnd 8: 1 sc in each st (8 sc)
Sl st into the first sc and fasten off. Leave a long tail for sewing.
Grab the tail and pinch the ear together on rounds 1-2. Sew back and forth to shape the ear.
Arms
Color A and B
Start with color B
Rnd 1: 6 sc into a mr (6 sc)
Rnd 2: 2 sc in each st (12 sc)
Rnd 3: (1 sc, sc inc) x 6 (18 sc)
Change to color A on the last pull through.
Rnd 4-14: 1 sc in each st for 11 rounds (18 sc)
Fill only the lower part with stuffing. Close the hole with 8 single crochet stitches to close the arm. Fasten off and leave a long tail for sewing.
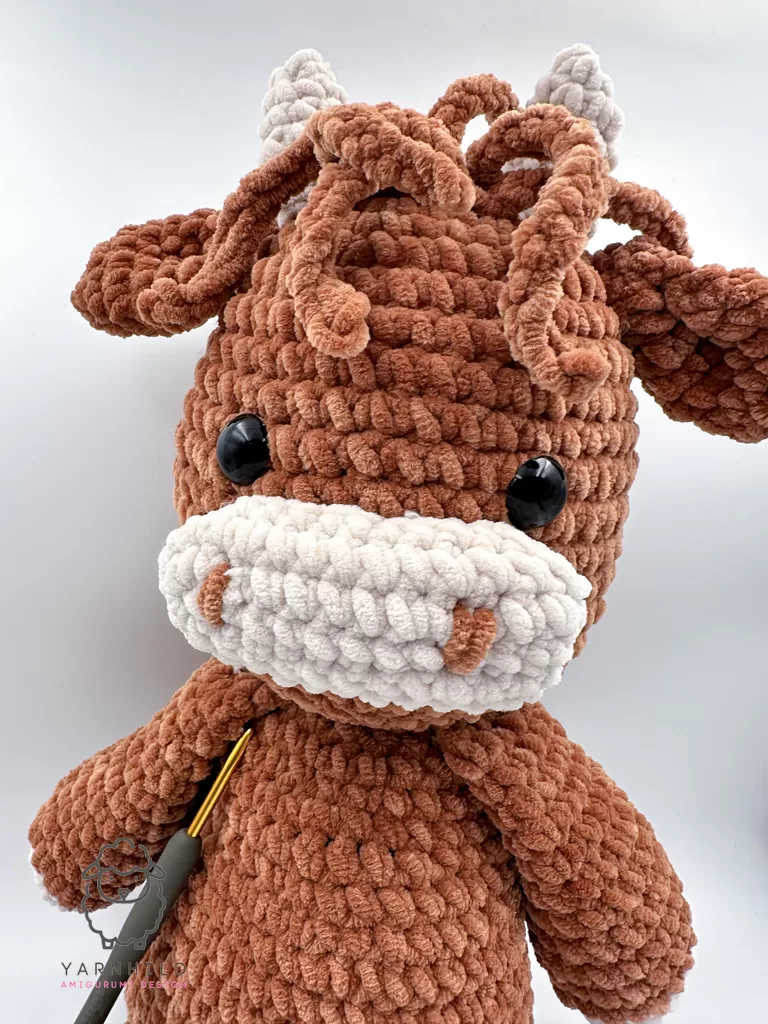
The head
Place safety eyes between rounds 10 and 11, 6 single crochet apart. Sew on the nose between rounds 12-14, as close to the eyes as possible. Stuff the nose lightly.
Sew on the horns on between rounds 2-4. Sew on the horns directly after the ears between rounds 5-6. Use a card board and place it in the body of the cow. This can be used to make the head more stable. An empty toilet roll can be used. Sew around the head into each stitch of the body and the head. Sew on the arms on the neck. A tip is to use knitting needles to place the body parts for easier visualisation.
Nostrils
Sew back and forth a couple of times with color A on the middle of the nose 7 sc stitches apart.
The hair
Attach yarn in color A on the head with a slip stitch. Start on round 1 in the middle of the head, between the horns. Chain 25 for longer strands and about 12-13 for shorter strands of hair.
Sl st into each chain and chain your way back to the head. St st into the same stitch as the chain to finish one strand of hair. Sl st into the next stitch and repeat for the next strand of hair and all the rest. It is up to you how many strands of hair you want. I made 7 strands, 2 longer ones and 5 shorter ones. I made a few strands in round 1 and the rest in round 2.
Tail
Attach some yarn on the back on round 3 or the position you see fitting and make 8 chains. Cut the yarn and weave in ends.

This pattern is great, I'm just not exactly sure how the stitch count on the nose works??
You have 12sc on each side so (24sc) in round 1, then you should get 30sc for round 2, but there isn't enough stitches from round 1 to accommodate that, so I'm not exactly sure how it works.
Other than that this pattern is great so far and I'm really enjoying it!