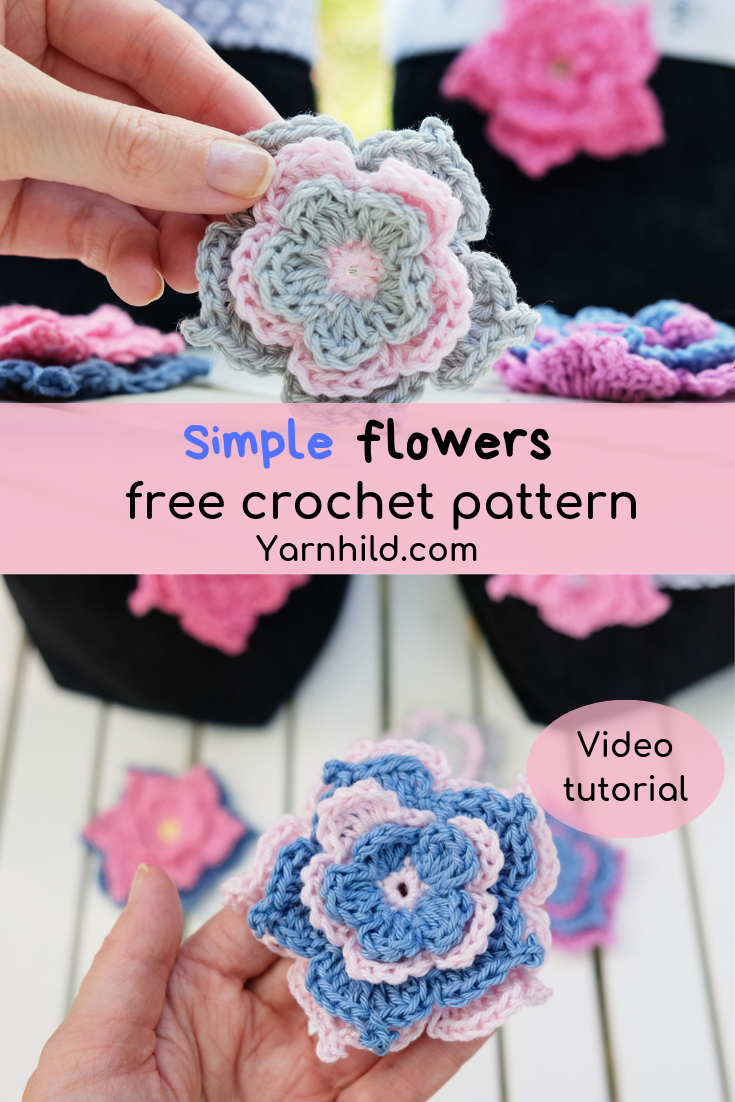
Today I am going to share a crochet flower pattern with you, so go and find some yarn and a hook and let's stitch up some Flora-flowers!
I have actually never made a flower pattern before. The Flora flower pattern repeats its self from a certain point. So once you have memoized it, you can bring this little project everywhere. You can also make it bigger by adding more rounds.
I almost always bring a little crochet project with me when I go somewhere. You never know when you have to wait, and what better way to pass the time with crocheting?
Disclaimer: This blogpost contains affiliate links. Read more about it here.
The pattern for the flower you can find here, and if you want to sew a fabric basket, I suggest that you go and search on YouTube or Pinterest.
I took a sewing course when my son was a baby. However, I learned that it wasn't always easy to sew with a baby.
After the course, I bought a sewing machine, but I fell in love with crochet. The sewing machine was left in the corner and I crocheted instead.
Last month, however, my wrist started to hurt from too much crocheting. I went to see an orthopaedic and it's much better now. My wrist needed a break, but I needed a creative outlet. So I found my sewing machine, the one standing in the corner, collecting dust.
Crochet basket
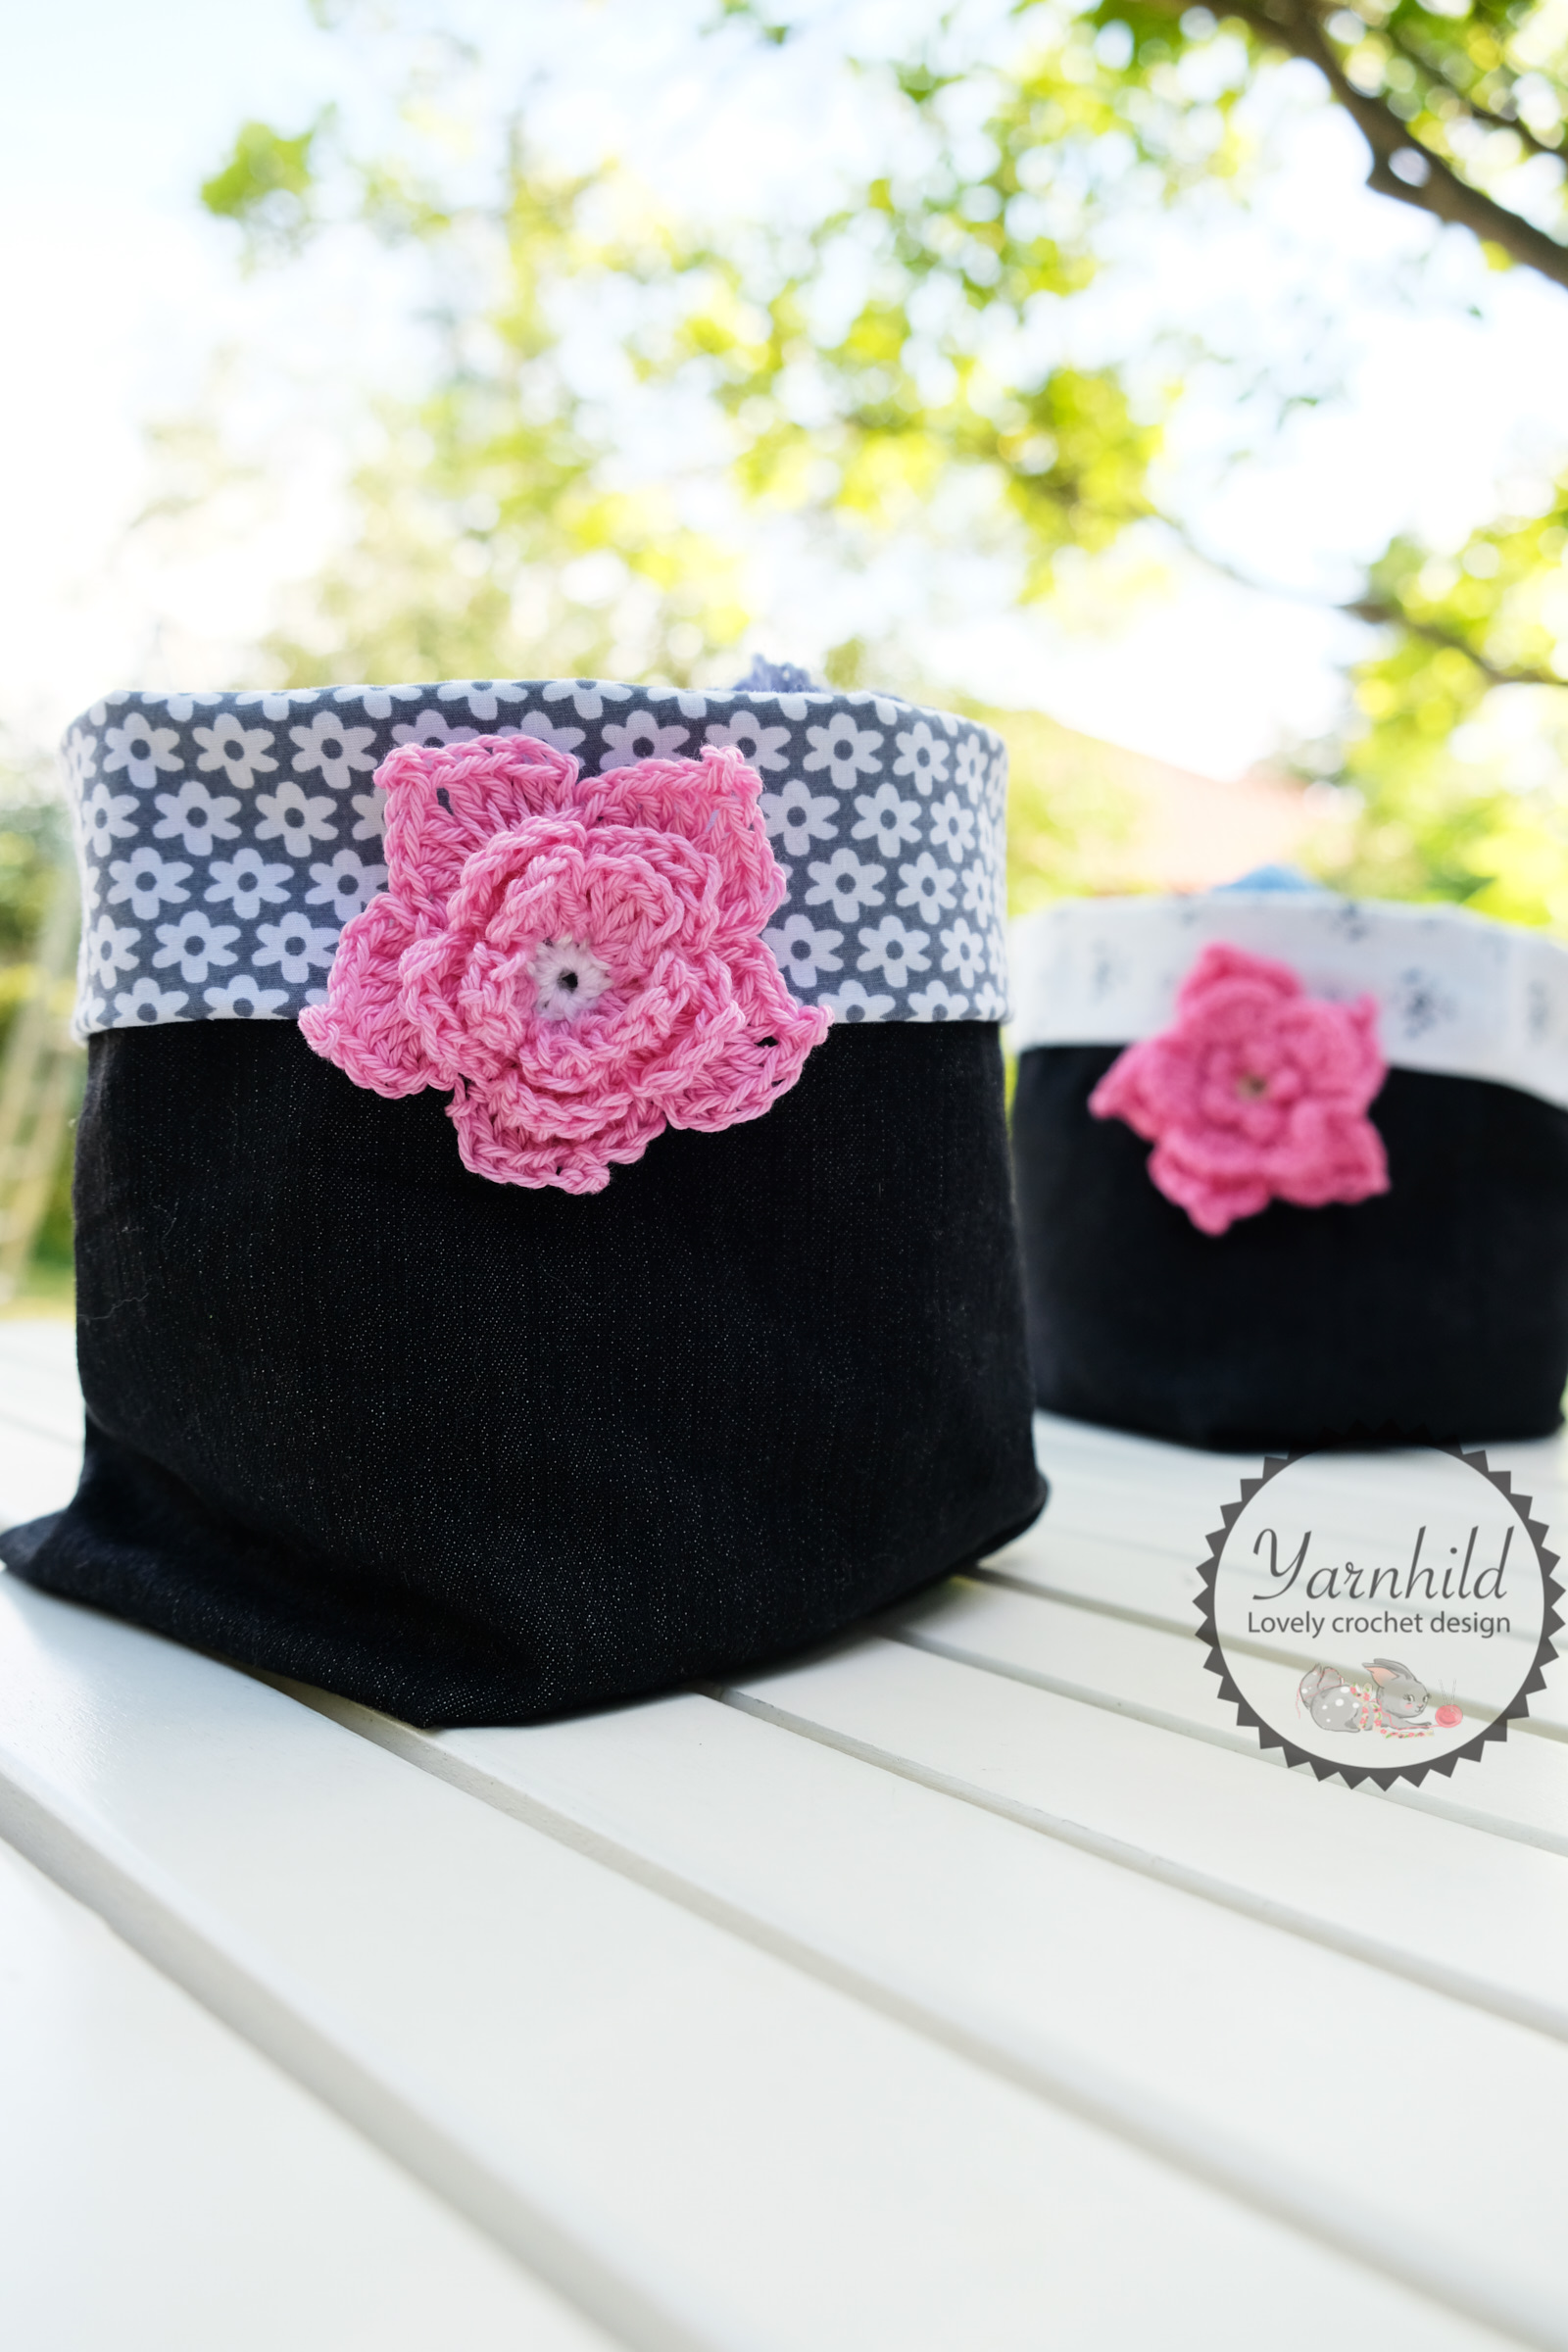
You can make this simple basket to go with the flower!
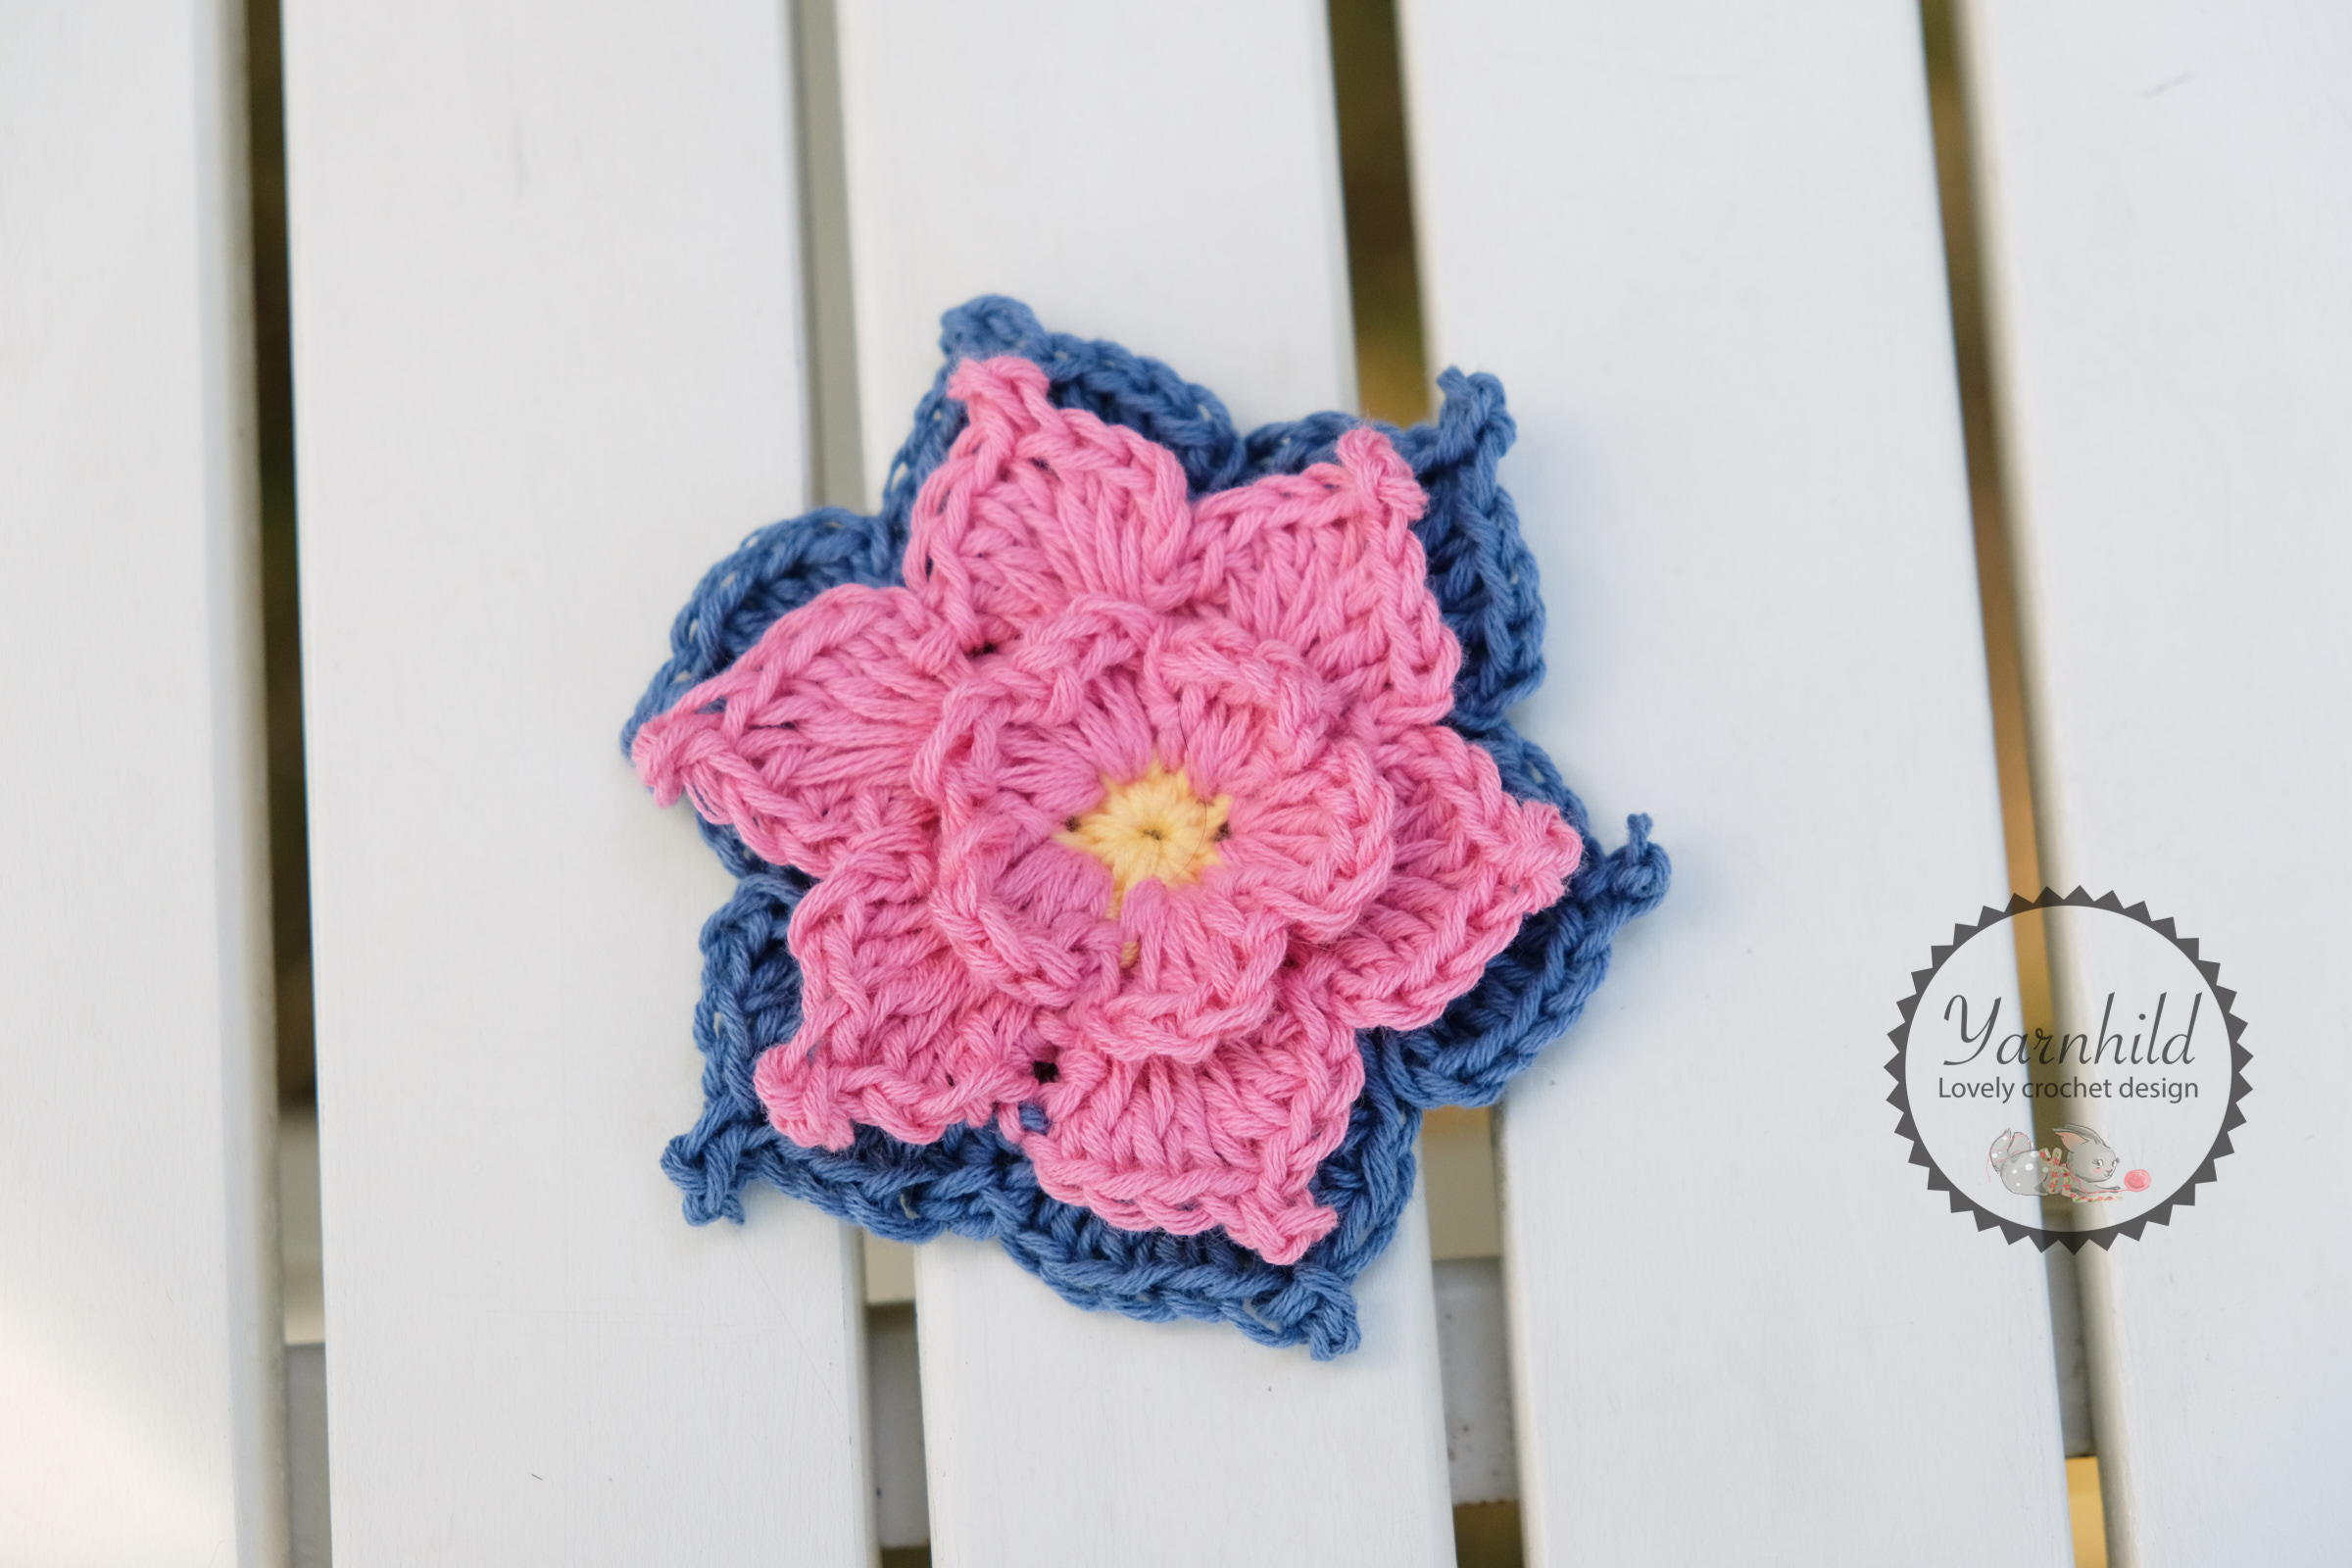
Flowers
I am happy with how they turned out, but felt like something where missing. So I decided to make some crochet flowers to pimp them up!
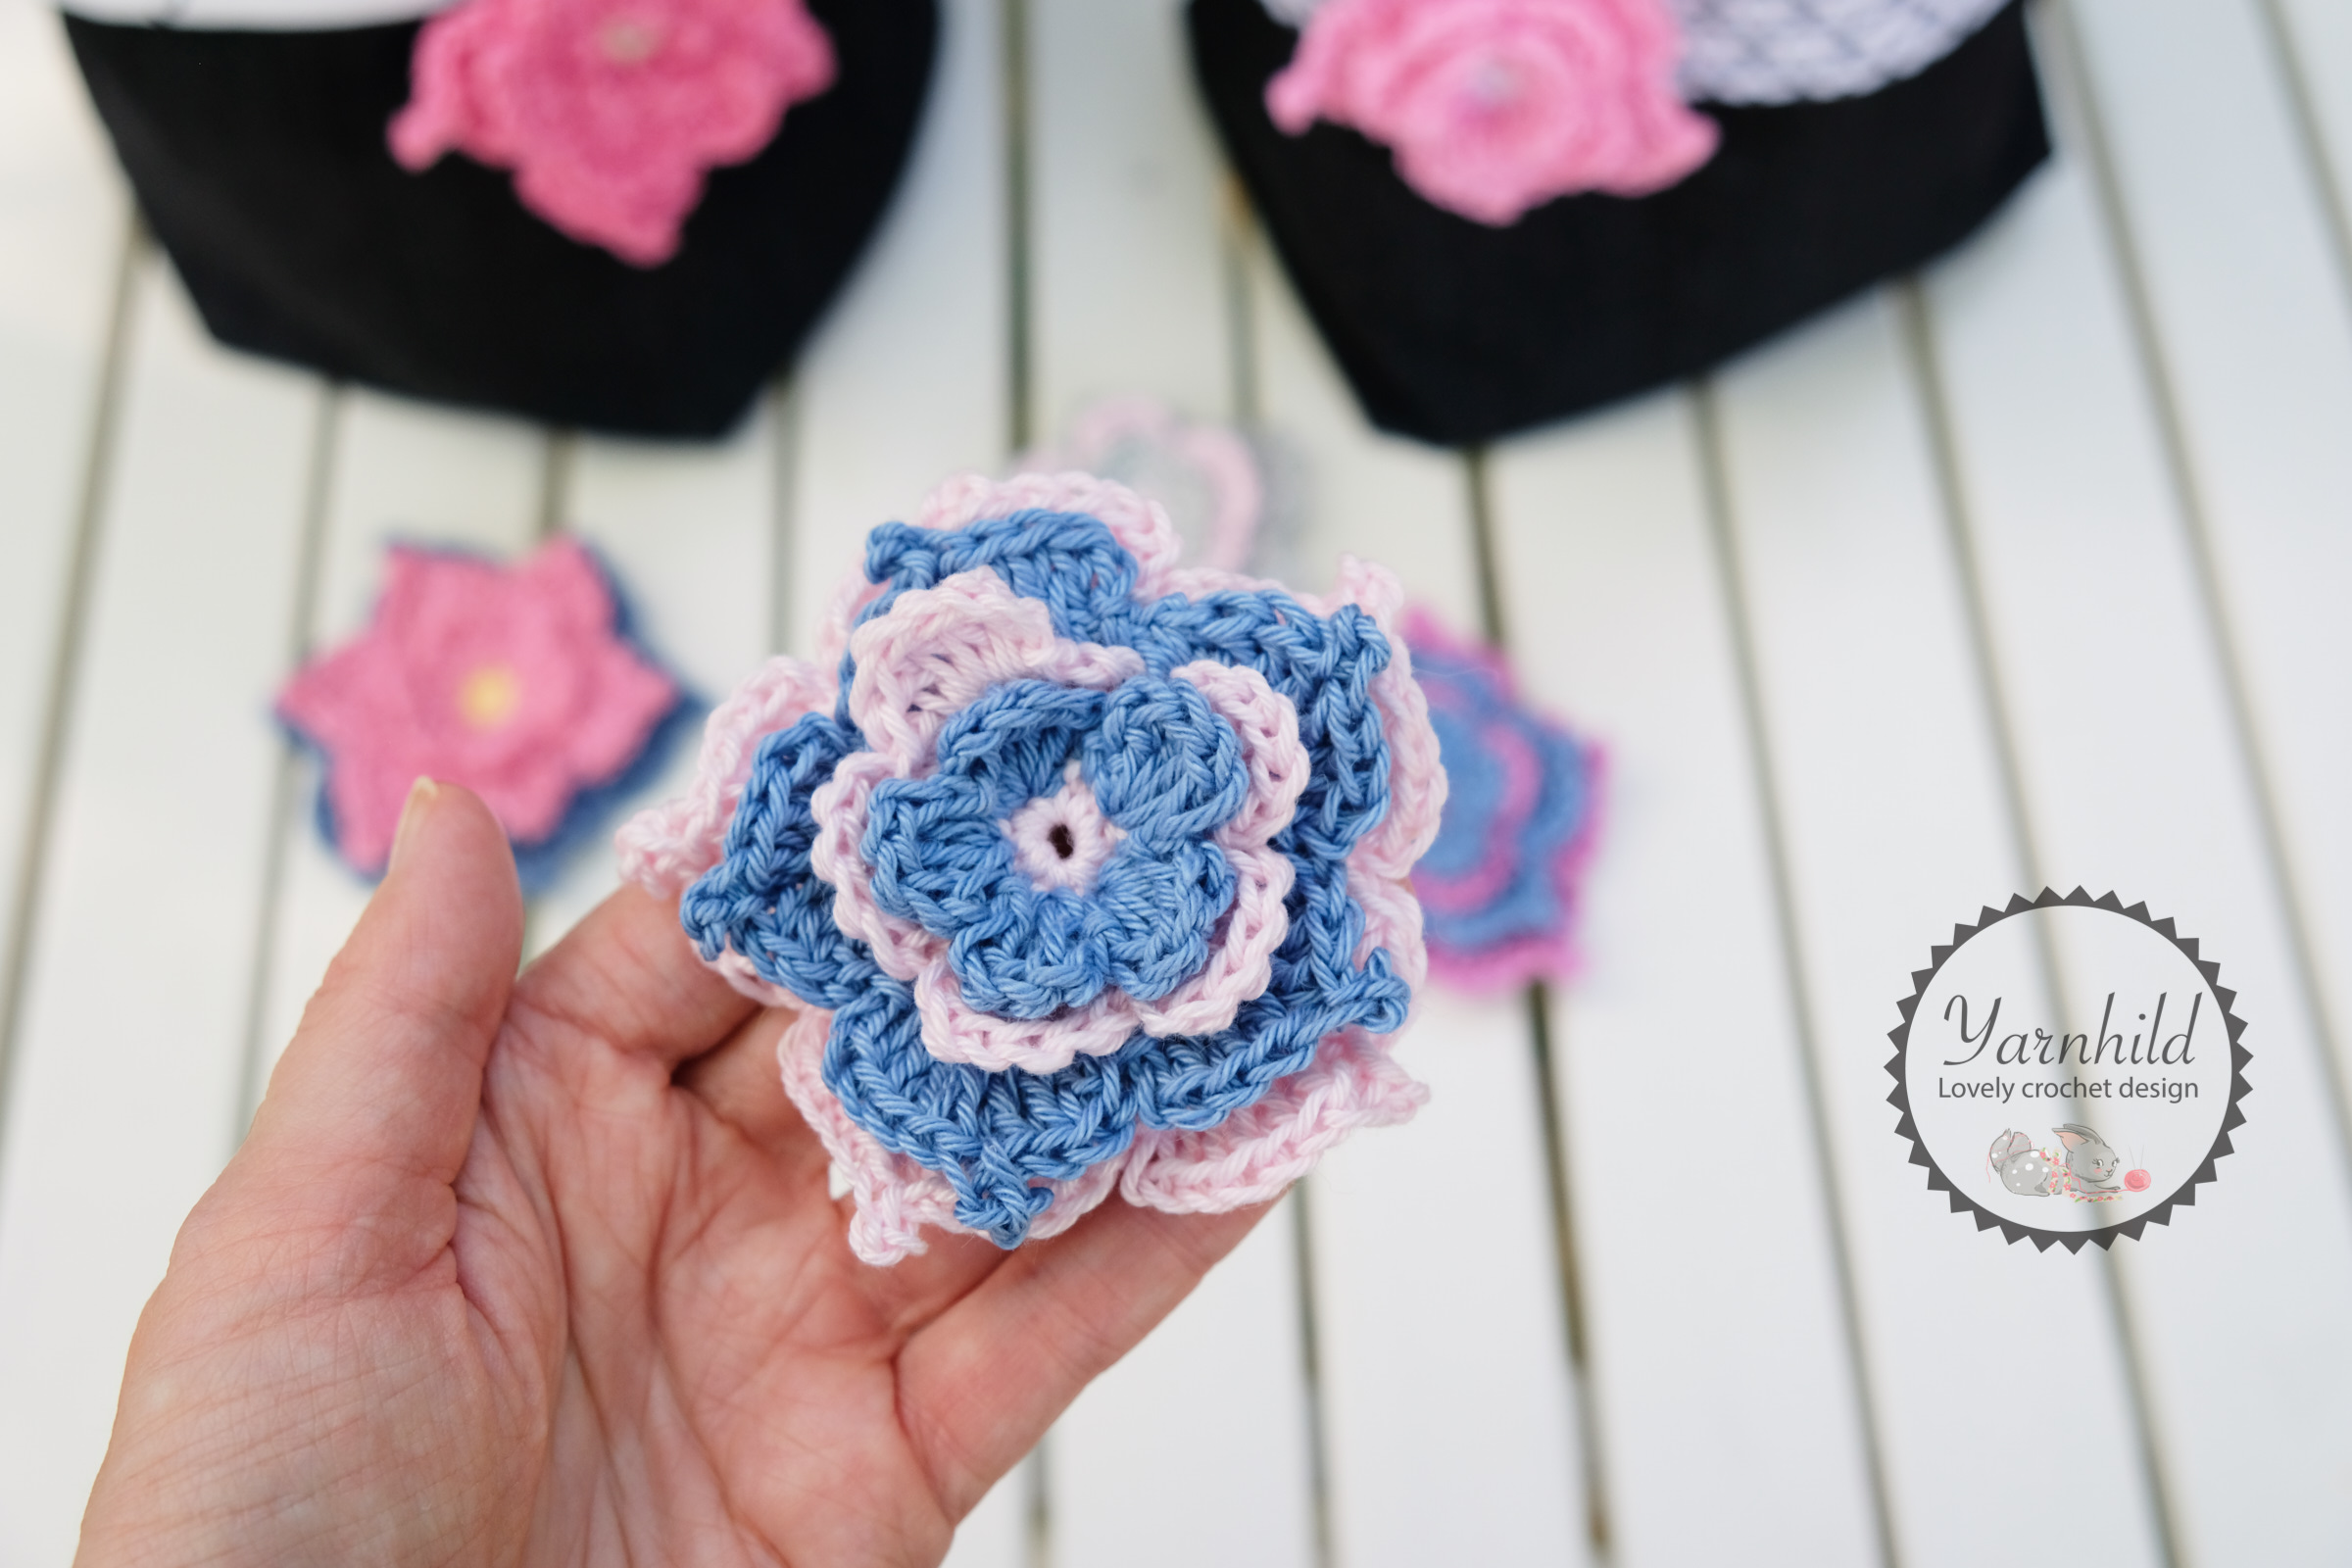
I made several in different colors. I love how you can change the look by alternating the colors.
If you are more of the visual type, you can also follow the video tutorial. Otherwise, scroll for the free pattern.
Print friendly version
If you want to get the add-free print for the crochet flower, you can find it here.
Flora - free crochet flower pattern
Abbreviations – US terms
ch – chain
yo – yarn over
st – stitch
sl st – slip stitch
sc – single crochet
hdc – half double crochet
picot stitch –ch 3, sl st in the first ch.
yo – yarn over
dc – double crochet
Mr – magic ring
Materials
Stitch marker
Crochet hook 3.0 mm/C2
Scissors
Yarn, sports weight in two different colors. Color A = pink, color B = Blue
Amount of yarn needed: about 5 g/0.7 oz
About the pattern
Skill level: Easy
The flower can be used as an appliqué, for example, a basket or purse.
Finished size using a 3mm/C2 hook: 8 x 8 cm/3.14”
Extra tip!
To make the flower bigger, just repeat rows 7 and 8. Add one extra chain in each 7th row and increase with 2 dc in each 8th row (one dc on each side of the picot stitch). You can also sew on a little button or a pearl in the middle.
In color A
R1: Mr and 10 sc in the ring. Sl st in the first sc and change color to pink/purple = 10 sc
Pull the ring closed.
Change to color B
R2: Ch 2 (counts as 1 hdc through the entire pattern). In the same st: 4 dc, 1 hdc. * Sl st in next, 1 hdc, 4 dc, 1 hdc in next* Repeat 3 more times. Sl st in the top the first st, 1 ch = 5 petals.
Change to color A
Turn the work and work on the back side to create chain spaces for the petals in round 4.
R3: On the back side. *Ch 3, find two strands (strands from the hdc from the previous round) between the petals on the back side and sl st into those*. Watch this videofor more details. Repeat 4 more times until you have 5 sets of chain spaces. Sl st in the first ch to close the round. Ch 1, turn.
R4: Now we are going to work around the chain space from last round. Sl st in the first chain space.
Ch 2: 4 dc, 1 hdc. *Sl st in next chain space: ch 2, 4 dc, 1 hdc* Repeat 3 more times. Sl st in the first st = 5 petals.
Change to color B
R5: Turn work. *Ch 4, find two strands (strands from the hdc from the previous round) between the petals on the back side and sl st into those*. Repeat 4 more times until you have 5 sets of chain spaces. Sl st in the first ch to close the round. Ch 1, turn
R6: As round 4, work around the chain space from last round: Ch 2, 3 dc, 1 picot st (ch 3, sl st in the first ch), 3 dc, 1 hdc. *Sl st in the next ch, ch 2, 3 dc, 1 picot st, 3 dc, 1 hdc* Repeat *-* 3 more times = 5 petals (6 dc, 2 hdc, 1 picot stitch in each.
Change to color A
R7: Turn work. *Ch 5, find two strands (strands from the
R 8: As round 4, work around the chain space from last round: Ch 2, 4 dc, 1 picot st (ch 3, sl st in the first ch), 4 dc, 1 hdc. *Sl st in the next ch, ch 2, 3 dc, 1 picot st, 4 dc, 1 hdc* Repeat *-* 3 more times. = 5 petals (8 dc, 2 hdc, 1 picot stitch in each).
Sl st in the first st. Cut the yarn. Weave in ends, but leave a strand if you want to fasten the flower on something.