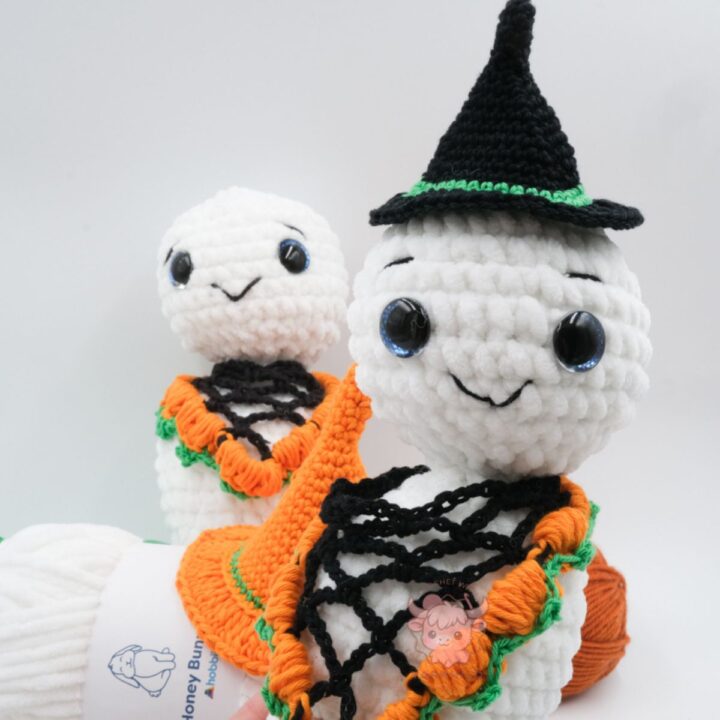
Rim the Ghost - Crochet Ghost Pattern -
Looking for the perfect spooky crochet ghost pattern this season? Let me introduce you to Rim, a soft, squishy crochet ghost with just the right balance of cuteness and creepy charm.
Pin this for later on Pinterest.


Rim’s name comes from the Norwegian word “rim,” meaning frost, inspired by the crisp air and chilly mornings of fall. He’s more than just a ghost… he’s a little character, full of personality, with a witch hat and pumpkin-themed shawl to keep him cozy on haunted October nights.
This crochet ghost pattern isn’t for total beginners, but if you’ve made a few amigurumi before and want to challenge yourself with new textures (hello puff stitches!), Rim is such a satisfying make. His body is shaped with classic increases and decreases, and his accessories add a fun twist — especially the pumpkin edge made with tiny bobbles.
Printable pattern
You can also find the printable, ad-free PDF version of Rim the Crochet Ghost over on my brand-new shop!
There aren’t many patterns there yet, but I’m adding more very soon — including exclusive bundles and seasonal favourites. Every purchase helps support Yarnhild and lets me keep creating more magical patterns for you
Inspiration behind the crochet ghost Rim
I wanted to create a crochet ghost pattern with something extra — not just a simple shape, but a character with charm and detail. The textured shawl with its tiny pumpkin-edge stitches was the perfect way to add that special seasonal twist.

Video tutorial
If you are having problems following the pattern, I have made a video tutorial for Rim.
Looking for more Halloween patterns?
Well, you have come to the right place! I have several free crochet Halloween patterns on my blog. Check out this bute bat, or this ghost, or how about a pumpkin mouse?

Materials you'll need for the crochet ghost
The ghost's main body is made using chenille yarn (I used Hobbii Baby Snuggle), which makes him super soft and plush. The accessories — the witch hat and the pumpkin shawl — are made with cotton yarn for shape and contrast.
Here’s what you’ll need:
- Chenille yarn (white – approx. 40g)
- Cotton yarn (black, orange, green – small amounts)
- Crochet hooks: 4.5 mm + 3.5 mm
- Safety eyes (I used 20 mm)
- Stuffing, tapestry needle, black embroidery thread
- Optional: stabilizer insert between the head and body
Rim the Ghost
Materials
- Abbreviations
- ch – chain
- MR – magic ring
- rnd – round
- st – stitch
- sc – single crochet
- hdc - half double crochet
- dc - double crochet
- tr - treble crochet
- sc inc – increase (2 sc in the same stitch)
- sc2tog – single crochet two stitches together (decrease)
- BO – bobble stitch (see instructions below)
- *-* repeat action
- FLO - front loop only
Tools
- This pattern uses chenille yarn from Hobbii (Baby Snuggle). The hat and shawl are made of cotton yarn, sports weight.
- Chernille yarn in color A (white): approx. 40 g
- Cotton yarn in color B (black): approx. 30 g
- Cotton yarn in color C (orange): approx. 40 g
- Cotton yarn in color D (green): approx. 10 g
- Crochet hook: 4.5 mm and 3.5 mm
- Safety eyes: 20 mm (smaller or bigger is optional)
- Fiberfill stuffing
- Scissors
- Tapestry needle
- Embroidery yarn in black.
- Stabilizing insert between the head and the body (optional).
Instructions
Head
The head and all the other parts are crocheted in continuous spiral rounds. Use a stitch marker and move it up as you go.
In color A
Rnd 1: 8 sc in a MR = 8 sc
Rnd 2: sc inc x 8 = 16 sc
Rnd 3: (1 sc, sc inc) x 8 = 24 sc
Rnd 4: (2 sc, sc inc) x 8 = 32 sc
Rnd 5–10: 32 sc
Insert safety eyes between Rnd 7 and 8, about 5 sts apart.
Add stuffing.
Rnd 11: (2 sc, sc dec) x 8 = 24 sc
Rnd 12: (1 sc, sc dec) x 8 = 16 sc
Rnd 13: sc dec x 8 = 8 sc
Sl st into the first st and fasten off. Leave a tail.
The body
Crocheted from the bottom
In white
Rnd 1: 4 sc in a MR = 4 sc
Rnd 2: (1 sc, sc inc) x 2 =6 sc
Rnd 3: (2 sc, sc inc) x 2 = 8 sc
Rnd 4: (1 sc, sc inc) x 4 = 12 sc
Rnd 5: (2 sc, sc inc) x 4 = 16 sc
Rnd 6-7: 16 sc
Rnd 8: (3 sc, sc inc) x 4 = 20 sc
Rnd 9: sc dec x4, 8 sc, sc inc x4 = 20 sc
Rnd 10: 20 sc
Rnd 12: (1 sc, sc inc) x 4, (1 sc, sc2tog) x4 = 20 sc
Rnd 13: (1 sc sc inc) x 10 = 30 sc
Rnd 14-19: 30 sc
Rnd 20: (3 sc, sc2tog) x 6 = 24 sc
Rnd 21: (1 sc, sc2tog) x 8 = 16 sc
Rnd 22: sc2tog x 8 = 8 sc
Sl st into the first st and fasten off.
Attaching the Head
Before sewing the head and body together, make sure they are both fully stuffed. The bottom of the head should be firm so it keeps its shape.
You can optionally add a small circle of cardboard or thin plastic inside the head for extra support. Let it sit flat at the bottom of the head and gently slide part of it into the top of the body to keep everything steady.
Position the head on top of the body and sew it on using a whip stitch or your preferred joining method. Add a bit more stuffing as you go if needed. Once it’s secure, weave in the ends and shape everything into place.
Shawl
In color B (cotton yarn)
3,5 mm crochet hook
Row 1: Ch 10, 1 tr in the first ch. Turn work.
Row 2: Ch 10, turn work, 1 sc into the first ch sp, ch 6, 1 tr into the same ch sp.
Row 3: Ch 10, turn work, 1 sc into the first ch sp, ch 6, 1 sc into the next ch sp, ch 6, 1 tr into the same ch sp.
Row 4: Ch 10, turn work, 1 sc into the first ch sp, *ch 6, 1 sc into the next ch sp*. Repeat from *-* 1 more time. Ch 6, 1 tr into the same ch sp.
Row 5: Ch 10, turn work, 1 sc into the first ch sp, *ch 6, 1 sc into the next ch sp*. Repeat from *-* 2 more times. Ch 6, 1 tr into the same ch sp.
Row 6: Ch 10, turn work, 1 sc into the first ch sp, *ch 6, 1 sc into the next ch sp*. Repeat from *-* 3 more times. Ch 6, 1 tr into the same ch sp.
If you want to make a bigger shawl, repeat the *—* part one more time for each row.
The shawl's pumpkins are made with the puff stitch, clustered in the open chain spaces from the previous rows.
Pumpkin Stitch (worked in the ch-space):
Continue with color C.
Sl st into the ch sp, ch 2.
*(YO, pull up loop) x4, YO, pull through 8 loops. YO and pull through 2 loops*. Repeat from *-* one more time until you have 2 puff stitches (pumpkins) in the ch sp.
Ch 2, sl st into the same ch sp, sc in the next st, sl st into the next ch sp. Ch 2 and repeat *-* to make the 2 pumpkins. Ch 2, sl st into the same ch sp, sc in the next st, sl st into the ch sp.
Repeat this frequency all around the shawl. Instead of 2 pumpkins on the pointy part of the shawl, place 3 pumpkins.
At the end of the last pumpkin, change to green yarn on the last pull through.
*Ch 2, 1 sc in the ch 2 sp, sc2tog over the 2 pumpkins, 1 hdc, ch 2, sl st into the base of the hdc, 1 sc next ch 2 sp, ch 2* Repeat from *-* to the pointy part. 1 sc in the ch 2 sp,sc3tog, ch 3, 1 dc, ch 3, sl st into the base of the last dc, *1 sc in the next ch 2 sp, ch 2, 1 sc into the next ch 2 sp, sc2tog over the 2 pumpkins, 1 hdc, ch 2, sl st into the base of the hdc, 1 sc next ch 2 sp* Repeat from *-* to the edge of the shawl.
Hat
Color: Blach and one contrast color.
Hat Cone
Rnd 1: 6 sc in a magic ring (6)
Rnds 2–7: sc in each st (6 rounds) (6)
Rnd 8: (1 sc, inc) x3 (9)
Rnd 9: (2 sc, inc) x3 (12)
Rnd 10: (3 sc, inc) x3 (15)
Rnd 11: (4 sc, inc) x3 (18)
Rnd 12: (5 sc, inc) x3 (21)
Rnd 13: (6 sc, inc) x3 (24)
Rnd 14: (7 sc, inc) x3 (27)
Rnd 15: (8 sc, inc) x3 (30)
Rnd 16: (9 sc, inc) x3 (33)
Rnd 17: (10 sc, inc) x3 (36)
Rnd 18: (11 sc, inc) x3 (39)
Rnd 19: (12 sc, inc) x3 (42)
Rnd 20: (13 sc, inc) x3 (45)
Hat Band (green yarn)
Rnd 21: Change to green.
(14 sc, inc) x3 (48)
Hat Brim
Rnd 22: Change back to black and work in FLO.
(dc inc, 1 dc) around = 72 dc
Sl st into the first stitch and cut the yarn. Leave a strand of you wish to sew the hat on the ghost.
Assembly
Embroider a mouth and add eyebrows or eyelashes if you'd like — this is where Rim really gets her personality!
Weave in all yarn ends and shape the ghost gently with your hands. Adjust the hat and shawl to sit nicely in place.